Ultimate Tensile Strength, Yield Strength and Proof Stress
The maximum stress reached in a tension test is defined as ultimate tensile strength. As shown in diagram the highest stress is at point e and ultimate tensile stress UTS is represented by su. Some authors represent it by du. The point C marks the beginning while d marks the end of yielding. The C is known as upper yield point while d is named as the lower yield point. The stress corresponding to lower yield point is defined like the yield strength. For the reasons of machines, the part has practically failed if stress reaches yield strength, (sg), for this marks the beginning of the plastic deformation. In machine parts, Plastic deformation is not permissible. Thus one may be inclined to treat sg, as failure criterion. We will further discuss this later in the unit.
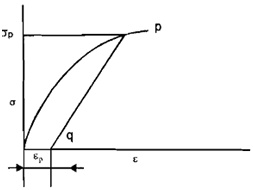
This is unfortunate to note that many practical materials indicates s-ediagrams which do not have such well defined yielding as in diagrams. Instead they indicate a continuous transition from elastic to plastic deformation. In such cases yield strength (sg) becomes difficult to calculate. For this reason an alternative, called proof stress, is defined that is a stress is corresponding to specific predefined strain. The proof stress is denoted by sp. A s-e diagram for a material, which indicates no distinct yield, is shown in diagram. The proof stress is determined corresponding to proof strain a ep, which is after called offset by laying ep, on strain axis to get a point q on a axis and drawing a line parallel to elastic line to cut the s-e curve at p. Then sp, is measured on stress axis. The values of proof offset or strain have been standardized for different materials by American Society for Testing and Materials ASTM. For illustration, offset for aluminum alloys is 0.2%, similar in for steels while it is 0.05% fore cast iron or Cl and 0.35 for brass and bronze.

Diagram of Proof Stress σp) Corresponding to Offset εp