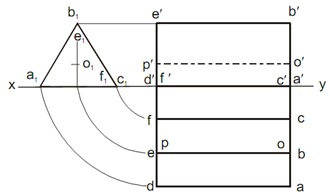
Orthographic Projections of Solid While the Axis is Parallel to both the HP and VP:
When the axis is parallel to both the VP and HP, neither the top view nor the front view will display the actual shape of the base. During this case, the projection of the solid on an auxiliary plane perpendicular to both the plane, that is the side view should be sketched first. The front view and the top view are then projected from the side view. In Example, above process is explained for drawing orthographic projections of a prism.
Example
A triangular prism base 40 millimeter side and height 65 millimeter is resting on the ground on one of its, rectangular faces along with the axis parallel to both VP and HP. Draw its projection.
Solution
(a)
Sketch an equilateral triangle a1 b1 c1 representing the side view along with one side a1 c1 in xy.

(b) Project the front view horizontally from this triangle whereas a′ d′ is the height of prism. Situate d′ e′ f′ and complete the front view.
(c) From the front view project down, the top view and the side view and mark abc and def and complete the plan.