Degree of Relationship between Surfaces
The primary reasons for relating surfaces on the part print are to guarantee accuracy in the workpiece and economy in manufacture. A competent process engineer realizes that unless he can fully establish the relationship between surfaces, he cannot hope to achieve the accuracy specified. Economy can only result when good part are produced.
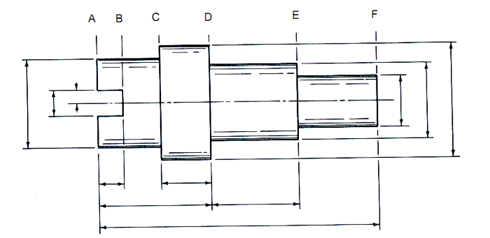
Actually, on a given workpiece all surfaces are related to one another either directly or indirectly. The dimensioning system will generally indicate how closely the relationship exists. Each dimension presented on the part print indicates a direct relationship between two surfaces or lines. The object shown in Figure 4 indicates varying degree of dimensional relationships. For example, surface A is directly related to surfaces B, D, and F. Surface A is related to surface E indirectly since it is connected dimensionally only through surface D. The relationship between surface B and surface C is even more indirect since they can only be related through surfaces A and D. The number of direct dimensional relationship connecting dimensional links that must be considered in relating one surface to another indicates their degree of relationship.

Figure 4 : Sketch to Illustrate Degrees of Relationship Between Surfaces
Thus, surfaces A and D have a first degree relationship, surfaces A and E have a second degree relationship, and surfaces B and C have a third degree relationship. Because dimensional tolerances must also be considered when relating surfaces, it follows that the degree to which surfaces are related is tied in closely with the tolerances which must be held. If it is felt that a certain tolerance must be held between two surfaces not directly related, the tolerances on the interconnecting dimensions must be tightened to make certain that their collective variations do not exceed those desired in the direct dimension.