GridBagLayout Class:
A GridBagLayout class is complex enough to fill a whole chapter by itself. This class was added to the AWT very late in the Java beta. Thus, several early acceptors of Java didn't use this layout at all. A few early books omit it finished.
Of all the layouts offered through the AWT, GridBagLayout is the most versatile. Despite its funny name, once you learn how to use GridBagLayout, it will become an indispensable category of your Java toolkit.
Such as GridLayout, GridBagLayout places controls in a Container in a grid. The difference is in which in a GridBagLayout, controls could span any number of grid cells vertically, horizontally, or both. Controls can be placed in any grid cell. Cells can be of differing sizes as well.
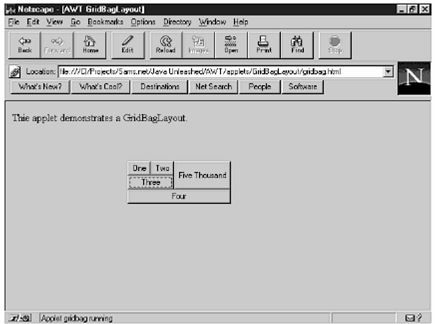
The gridbag applet displays five buttons in a GridBagLayout arrangement:
import java.awt.*;
public class gridbag extends java.applet.Applet {
public void init() {
Button b1 = new Button( "One" ) ;
Button b2 = new Button( "Two" ) ;
Button b3 = new Button( "Three" ) ;
Button b4 = new Button( "Four" ) ;
Button b5 = new Button( "Five Thousand" ) ;
GridBagLayout gridbag = new GridBagLayout();
setLayout( gridbag ) ;
{
GridBagConstraints c = new GridBagConstraints();
c.fill = GridBagConstraints.BOTH ;
c.gridx = 1 ;
c.gridy = 1 ;
gridbag.setConstraints(b1, c);
add( b1 ) ;
}
{
GridBagConstraints c = new GridBagConstraints();
c.anchor = GridBagConstraints.WEST ;
c.gridx = 2 ;
c.gridheight = 2 ;
gridbag.setConstraints(b2, c);
add( b2 ) ;
}
{
GridBagConstraints c = new GridBagConstraints();
c.fill = GridBagConstraints.BOTH ;
c.gridx = 1 ;
c.gridy = 2 ;
c.gridwidth = 2 ;
gridbag.setConstraints(b3, c);
add( b3 ) ;
}
{
GridBagConstraints c = new GridBagConstraints();
c.fill = GridBagConstraints.BOTH ;
c.gridx = 1 ;
c.gridy = 3 ;
c.gridwidth = 3 ;
gridbag.setConstraints(b4, c);
add( b4 ) ;
}
{
GridBagConstraints c = new GridBagConstraints();
c.fill = GridBagConstraints.VERTICAL ;
c.gridx = 3 ;
c.gridy = 1 ;
c.gridheight = 2 ;
gridbag.setConstraints(b5, c);
add( b5 ) ;
}
}
}
The key for using GridBagLayout is the GridBagConstraints class. This class is used to encapsulate data about each control which is added to the layout. A Setting the class data members decide how the controls will be placed. For use a GridBagLayout, you must make a GridBagConstraints object. Then set the data members of the GridBagConstraints object to suitably lay out the given control. Further, call the GridBagLayout's setConstraints() method to related a GridBagConstraints object along with a control. At last, add the control.