Rockwell Hardness
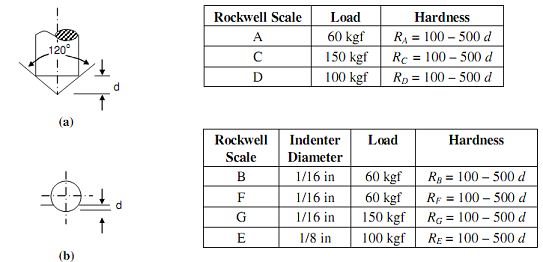
Rockwell hardness is another technique of hardness measurement that like Brinell hardness is extremely popular in engineering practice. In this technique two types of indenter name are: a Brale indenter in form of 120o diamond cone or steel balls of 1/16 in and 1/8 in diameter are employed. These indenters are represented in following figure. Rockwell method not same from Brinell method as Rockwell hardness is not measured as ratio of load to indentation surface region Instead, Rockwell hardness is measured on an arbitrary scale on that hardness number is inversely proportional to indentation's depth.
The technique consists in seating the test piece on platform of the machine and after that applying a minor load of 10 kgf on the test piece through the indenter. This slight load assists to seat the test piece and reduces the tendency of sinking or riding in. A main load such could be 150, 60 or 100 kgf is then applied and the depth of indentation is automatically recorded as hardness number on a dial gauge. The gauge's dial is divided into 100 divisions with every division representing a penetration of 0.002 millimeter. The dial scale is reversed hence a small indentation depth is read like high hardness.

Figure: (a) Brale Indenter or Diamond Cone; and (b) The Spherical Ball Indenter of Steel, d is the Depth of Penetration
One combination of indenter and load will not be capable to generate a wide range of hardness. Thus, loads along with three indenters are employed in different combinations to offer wide range of measure hardness of various materials. Above figure shows the dissimilar scales of Rockwell hardness that is often expressed as R along with a suffix A, B or C to denote the scale. The scale or RC is very generally used for steel.
The Rockwell hardness is more times preferred over Brinell hardness since this test could be performed on extremely small parts in unfinished or finished condition. Because the indentation is extremely small, the finished surface is unfinished and not spoilt surface does not influence the indentation. Because no measurement of indentation and consequent computation also are needed, the technique is direct, free and fast from personal error.
Several precautions though, regarding test piece and indentation have to the seemed. The thickness of the plate test piece must be at least ten times the indentation's depth. It will ignore any effect of indentation to pass via the thickness. The distance among two adjacent impressions must at least be three times the indentation size. The hardness read from indenting the curved surface must be corrected for curvature. The surface on that indentation is made should be smooth and clean and this should be well seated on a clean platform. The rate of load application is prohibited in Rockwell hardness testing machine and it is attained by a dashpot adjustment consequent to a standard rate of loading.