Knoop Hardness
Mostly it is required to find out the hardness over a very minute region or a very minute part. The indenters of techniques described previously might be superior to the area of part over that hardness is to be found. Microstructure individual constituents, delicate gear of a watch or the region, here sharp hardness gradient exists might be such demonstrations. The resolution to that a problem may be employing a very minute indenter beneath a minute load.

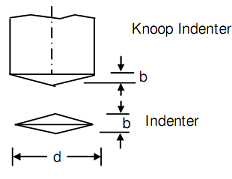
Figure: Knoop Indenter and Indentation
In a method of Knoop hardness measurement, a diamond indenter containing pyramidal faces along with very large occupied angle is employed. This indenter is pressed against a metallographically finished surface to generate an indentation of the diamond shape as in above figure. The longer diagonal of the impression is about seven times the shorter diagonal. The indentation depth is approximate one thirteenth of the longer diagonal. The Knoop Hardness Number or KHN is the measure of the ratio of load to projected region of impression.
Hence,
KHN = P/d2C.... . . Eq(5)
Here d is the length of longer diagonal and C is a diagonal pyramid factor, supplied via the manufacturer. The indentation load is very minute, often as low like 30 grams. The minute impression is measured beneath microscope and as the area over also that the hardness measurement is made is very minute, KHN is sometimes termed as micro-hardness.
This is highly essential here the surface of sample should have metallographic finish and also the indenting load prohibited carefully. Any errors in measurement of d can reasons error in hardness. The error in situating ends of the impression as to larger at lower load and hence the hardness has a tendency to increase with reduction in load and corrections for that error are accessible.