How can we use Culture Auto in project?
We will make a very simple login screen which we will try to use for English as well as the Greek.
The login screen will display English settings when an English user logs in and the Greek Settings when a Greek user logs in. So below are the some steps to start with.
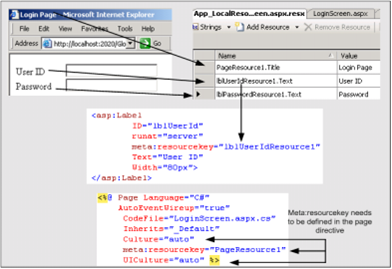
Figure: - Culture Auto in action
In the figure above you can view the login page i.e. the "LoginScreen.aspx". It is a simple page with 2 labels and 2 text boxes. The labels values i.e. the "User ID" and "Password" should be changed according to the regional settings set on the browser. So below are some of the steps for the same:-
1) Make 2 resource files as shown below one for Greece and other for the English. There are 3 values defined for "Userid", "Password" and the main title of the page. The One important thing to note is the naming convention of the files. You require tagging the naming convention with the language code. You can see from the figure below that the resource files naming convention is divided into 3 parts viz. Language code; File name & resource file extension. In the sample we will explain for the English & Greek language so I tagged the file with the "el" language code.
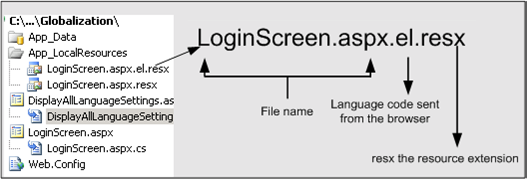
Figure: - Resource file naming conventions
Below are the 2 resource files defined :
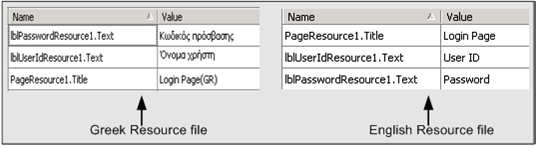
Figure: - Greek and English resource files
2) Once you have defined your resource files we require to define two attributes "UICulture=Auto" & "Culture=Auto". See the figure above "Culture Auto in Action".
3) The Final step you also require to define the resource key at the UI object level. You can see a sample of the similar in the figure "Culture Auto in Action".
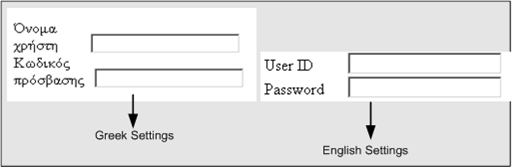
Figure: - Login screen according to settings
Compile the project, run and see the output after changing the regional settings for both the languages. You must see different outputs as shown in the figure above. Without a single line of code everything works.... That is the magic of the "UICulture=Auto" attribute.