Three tags form the necessary ingredients for developing a table.
TABLE: It is the main tag. It tells the browser that a table follows. It has attributes such as size and border width.
TR: A Table Row indicates a horizontal row which consists of Table Data cells.
TD: This tag indicates an individual block or cell in a table row. Therefore a table is made up of rows, in turn which are build up of cells.
|
|
|
|
|
|
|
<--This---
|
----is----
|
----a----
|
---Table---
|
---Row-->
|
|
|
|
|
Cell
|
|
|
|
|
|
|
|
Now you are ready to build some tables! We ought to stress that if you desire to learn how to make quality HTML documents, then you have to spending your time well
If you teach yourself the tags. In our estimation the best HTML editors to use for beginners are text-based editors. These editors will oblige you to code HTML yourself. They don't try to do it for you. Once you become an expert, you can employ other tools to more develop your productivity in order that you do not have to hand code your pages.
Now let us begin creating tables. The following example illustrates some tables with distinct attributes.
<HTML>
<HEAD>
<TITLE> ABC</TITLE>
</HEAD>
<BODY>
<!- - Table along with border = 5 - - >
First: Table along with border = 5
<TABLE BORDER=5>
<TR>
<TD>Ajay</TD>
</TR>
</TABLE>
<!- - Table having width = 50%- - >
Second: Table having width = 50%
<TABLE BORDER=3 WIDTH=50%>
<TR>
<TD> Ajay </TD>
</TR>
</TABLE>
<!- - Table having width = 50 - - >
Third: Table having width = 50
<TABLE BORDER=1 WIDTH=50>
<TR>
<TD> Ajay </TD>
</TR>
</TABLE>
<!- - Table having height = 75 and align = center & valign=top - - >
Fourth: Table having height = 75 and align = center & valign=top -
<TABLE BORDER=3 WIDTH=100 HEIGHT=75>
<TR>
<TD ALIGN=CENTER> Ajay </TD>
</TR>
</TABLE>
<!- - Table having an image- - >
Fifth: Table having an image
<TABLE BORDER=3>
<TR>
<TD ALIGN=LEFT VALIGN=MIDDLE><IMG SRC="image1.gif" WIDTH=32
HEIGHT=32></TD>
</TR>
</TABLE>
<!- - A complete Table having different sized columns- - >
Sixth: A complete Table having distinct sized columns
<TABLE BORDER=3 WIDTH=300 HEIGHT=75>
<TR>
<TD WIDTH=60%> Ajay </TD>
<TD WIDTH=20%>Ramesh</TD>
<TD WIDTH=20%>vijya</TD>
</TR>
<TR>
<TD>sachin</TD>
<TD>sapna</TD>
<TD>jyoti</TD>
</TR>
</TABLE>
</BODY>
</HTML>

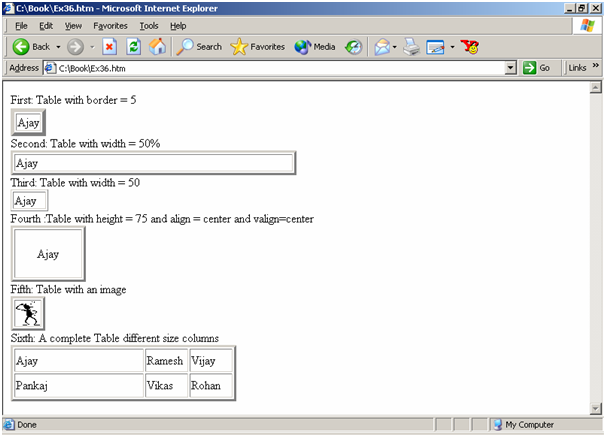
Figure: Tables with Different Attributes.
In the first table the BORDER attribute is given a value of 5. The default is no border that means border = 0.
While no sizes are indicated, the table is only as big as it has to be, as illustrated in the first & third table in above Figure. Specifying a table size is simple. Let us decrease the table size to 50% of the browser window as has been done in the second instance. Observe the output in the second table in above given Figure. As you can view in the example there are two ways to indicate the table width. Each style has its uses.
You can also alter the height of a table. The fourth table in Figure illustrates the effect of the changed height.
You can control where the data will show in the cell. For this reason we employ the ALIGN attribute. In the fourth table in Figure, we have utilized a center alignment. Likewise, right & left can be utilized for right & left alignment respectively. The default value is ALIGN=left. It is the value that the browser supposes if you have not told it otherwise.
You can also control where data will show vertically in a cell. For this reason you specify the VALIGN attribute. In the fourth table, we have utilized the value center.
You can also employ top or bottom. In a table data cell Images can also be placed & manipulated. In the folder which contains the document with the HTML code, substitute an IMG tag for text. It is illustrated in the fifth table. You can also include size attributes along all your image tags. We will not go in the details here, although doing so makes it easier for the browser to display the table and ignore any nasty little surprises whereas resizing the browser window, for example.
Now, let us look at multiple rows. Assume three more friends from across the street view what is going on and desire to be in your table. We think we will provide them their own row. Each row may be assigned distinct width for its columns. In the sixth table we have utilized 60/20/20 as the relative percentage widths of the three columns. The last table illustrates how to create a table having multiple rows & columns. The WIDTH attributes in the first row carry over to the second row.
Comment: This output can't come from the code given previous. From where are "First:", "Second:" etc coming?