How to create a rollover image, Computer Engineering

Assignment Help:

Q. How to Create a Rollover Image?

A rollover image is an image whose display changes when pointer passes ('rolls') over it. You will use Dreamweaver's Insert Rollover Image command to create three rollover images for navigation buttons-Trip Planner, Destinations, and Travel Logs.

A rollover image comprises two images: the image displayed when page first loads in the browser, and image displayed when the pointer moves over the original image. Be sure to use images that are the same size. First image dictates the size of the display, so if second image is much smaller or much larger, results will look unprofessional or distorted.

Next, you will add a navigation button with a rollover image to your page. Then you will add the other navigation buttons and preview the page in a browser to test rollovers.

1.  In Document window, click in first cell of the navigation button table.

This tells Dreamweaver where you want the image inserted.

2.  To insert a rollover image, do one of the following:

  In Common category of the Objects panel, click Insert Rollover Image icon.

  • Choose Insert > Interactive Image > Rollover Image.

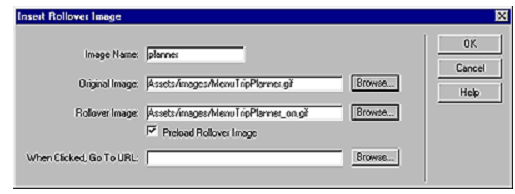
3.  In Insert Rollover Image dialog box, type planner in the Image Name field. This gives the image a unique name and makes it easily identifiable in HTML code.

4.  In Original Image field, click Browse; then navigate to MenuTripPlanner.gif and click Select (Windows) or Open (Macintosh).

 This tells Dreamweaver which image to display when page first loads.

5.  In Rollover Image field, click Browse; then navigate to

MenuTripPlanner_on.gif and click Select (Windows) or Open (Macintosh).

This tells Dreamweaver which image to display when pointer is over the original image.

6.  Make sure Preload Rollover Image option is selected so that rollover images load when page loads in the browser, ensuring a quick transition between images when a user moves the pointer over the original image.
1424_How to Create a Rollover Image.png

7.  Click OK to close dialog box.

 The image appears in document.

8.  Resize the layout cell to fit the image.


Related Discussions:- How to create a rollover image

Explain the term - restating the requirements, Restating the Requirements ...

Restating the Requirements To have clarity of analytical model of system you must state requirements specific performance constraints with optimization criteria in one documen

Write a program to find the area and perimeter of a circle, Write a program...

Write a program to find the area and perimeter of a circle of given radius # include void main() { float radius, area, perimeter, pi=3.14; printf("\nEnter the rad

Connectivity options accessible to internet subscribers, What are the diffe...

What are the different connectivity options accessible to Internet Subscribers? Explain in detail. Internet Connectivity Options: Internet access is perhaps one of the ma

Explain about the modules of magento, Magento supports installation of modu...

Magento supports installation of modules by a web-based interface accessible by the administration area of a Magento installation. Modules are hosted on the Magento eCommerce websi

Describe the graphic accelerators, Q. Describe the Graphic Accelerators? ...

Q. Describe the Graphic Accelerators? A Graphic Accelerator is actually a chip as a matter of fact most significant chip in your video card. The Graphic Accelerator is essentia

What is a sap system, What is a SAP system? The union of all s/w compo...

What is a SAP system? The union of all s/w components that are assigned to the similar databases is known as a SAP system.

Explain the following gray code, Q. Explain the following: a) Gray code ...

Q. Explain the following: a) Gray code b) Parity code c) Overflow Q. Give the counting up to 30 in Base 5. Q. Convert (175.6)8 into Gray code and Excess-3 code.

Explain the main part of step by step switching system, Explain the main pa...

Explain the main part of configuration of a step by step switching system with the help of a neat diagram . Configuration of a step by step switching system: A step

Explain the working of thousand line exchanges, E xplain the working of th...

E xplain the working of thousand line exchanges by u sing a combination of uniselectors and two motion selectors. The schematic diagram for such an exchange is demonstrated i

Explain the transport layer in detail, Explain the transport layer in detai...

Explain the transport layer in detail. Transport Layer: The transport layer controls and makes sure the end-to-end integrity of the data message propagated by the network am

Write Your Message!

Captcha
Free Assignment Quote

Assured A++ Grade

Get guaranteed satisfaction & time on delivery in every assignment order you paid with us! We ensure premium quality solution document along with free turntin report!

All rights reserved! Copyrights ©2019-2020 ExpertsMind IT Educational Pvt Ltd