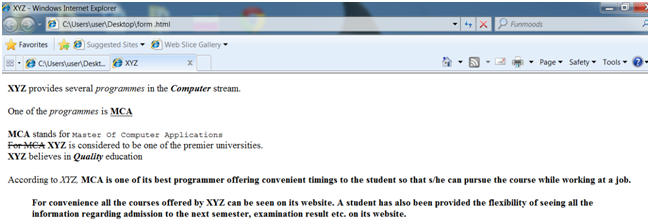
Now let us look at some more tags which can be used to format text. These are all given in the example illustrated in Figure
<HTML>
<HEAD>
<TITLE> XYZ</TITLE>
</HEAD>
<BODY>
<B> XYZ </B>
provides several <I> programmes </I>
in the <B><I>Computer </I></B> stream.
<P>
One of the <I> programmes </I> is <B><U> MCA</U></B>
</P>
<B>MCA </B> stands for <TT> Master Of Computer Applications </TT>
<BR>
<S>For MCA</S> <B> XYZ </B> is considered to be one of the premier universities.
<BR>
<STRONG>XYZ</STRONG> believes in <STRONG><EM> Quality</EM></STRONG> education
<BR>
<P>
According to <CITE> XYZ, </CITE> <B> MCA<B> is one of its best programmer offering convenient timings to the student so that s/he can pursue the course while working at a job.
</P>
<BLOCKQUOTE>
For convenience all the courses offered by XYZ can be seen on its website. A student has also been provided the flexibility of seeing all the information regarding admission to the next semester, examination result etc. on its website.
</BLOCKQUOTE>
<HR NOSHADE>
<B> contact details are :
<BR> Website : www.XYZ.ac.in
</ADDRESS>
</BODY>
</HTML>

Figure: An Example showing Various Formatting Tags.
a. BOLD: The text will displayed in boldface through writing it in between the <B> and </B> tags.
b. ITALICS: It begins with <I> and ends with </I> tag. It is utilized to display the text in italics.
c. UNDERLINE: It is utilized for underlining the text to be displayed. The <U> tag is utilized for this reason. These tags can be nested. Thus in order to see the text in boldface, in italics & underlined, it must be placed among the <B><I><U> and </U></I></B> tags. Note that the closing tags are written in reverse order, since any tag used in some other tag should be closed first.
d. PARAGRAPH: If you wished to display the text within the form of paragraphs, then the <P> tag will be used.
e. TT: The <TT> tag is utilized for displaying text in a fixed width font same to that of a typewriter.
f. STRIKE: If you wished the text to be marked along a strikethrough character, place it in the <S> and </S> tags.
g. STRONG: There are sure text-based browsers that do not leave the text as boldfaced. So you can employ the <STRONG> tag rather than the <B> tag. This displays the text to stand out in the most suitable manner for the browser.
h. EM: Just as the <STRONG> tag corresponds to the <B> tag, the <EM> might be used rather than the <I> tag. The purpose for using it is the same as for the <STRONG> tag. The <EM> tag is utilized for emphasizing the text in the manner most suitable to the browser.
i. BR: This tag is utilized for inserting a line break. The text written after the <BR> tag is displayed from the beginning of the next line onwards. This tag does not required a corresponding terminating tag.
j. HR: This tag puts horizontal line on the page. It has the given attributes:
o ALIGN: for aligning the line on the page. The probable values of this attribute are LEFT, RIGHT, and CENTER. It is useful while the width of the line is less than the width of the page.
o NOSHADE: This is used to prevent any shading effect.
o SIZE: used for denoting the thickness of the line.
o WIDTH: You can set the width of a line by this attribute. The value can be denoted either in pixels or as a percentage of the width of the page, for example. <HR WIDTH = "30%">.
k. BLOCKQUOTE: This tag indents left margin of the text. This is used for displaying the text as quoted text as illustrated in Figure
l. ADDRESS: This tag, as illustrated in Figure, displays the text in italics.
m. CITE: The text placed in between the <CITE> and </CITE> tags is rendered in italics through the browser.