Creation of the menu in visual basic, Visual Basic Programming

Assignment Help:

Creation of the Menu in VB

1. Initiate a new project by choosing a file and then new project.

2. Now select the Standard EXE as the Project type.

3. Build the Form1 active by clicking on it.

4. Pick the Tools and then Menu Editor to open the menu editor for designing.

5. Provide the caption as &display (i.e. display becomes the menu title)

6. Type a name. Suppose it be Mnudisp. This is a user defined.

7. To add the menu items click the next button in the menu editor.

8. Provide the caption as &square (i.e. square becomes the menu item)

9. Type a name. Suppose it be mnusquare. This is a user defined.

10. Relate a short cut key. The list box will pop up. Select a key. Say you have selected Ctrl + G. Then, to activate this menu item you require pressing CTRL and G keys altogether.

11. Put the checked property of the menu item square by clicking on the check box for the checked property.

12. Double click on the menu item. This takes you to the code window.

13. Type the given below code for the menu item square

Private Sub mnusquare_Click()

If (Form1.mnusquare.Checked) = False Then

Form1.mnusquare.Checked = True

Else

Form1.mnusquare.Checked = False

End If

End Sub

14. Whenever you click on square menu item for the first time, the property Checked is set to TRUE. Therefore the else part executes and sets the property Checked to the FALSE. The control behaves as a toggle.

15. To address the controls on the form, then use the form name. The menu item we want to manipulate is mnusquare .And hence, to access the control we say Form1.mnusquare.Later we want to manipulate Checked property. Therefore we are qualifying it as the Form1.mnusquare.Checked

16. Select the Run option.

17. Select the Start With Full Compile.

18. The form will be displayed.

19. Click on the disp menu title

20. The sub menu pops up. You have square as the menu item. Note that the check mark is as shown in figure.

21. If you click on the menu item square then the check mark will disappear during the next execution.

22. Clicking once further time will bring the check mark.

972_menu editor.png

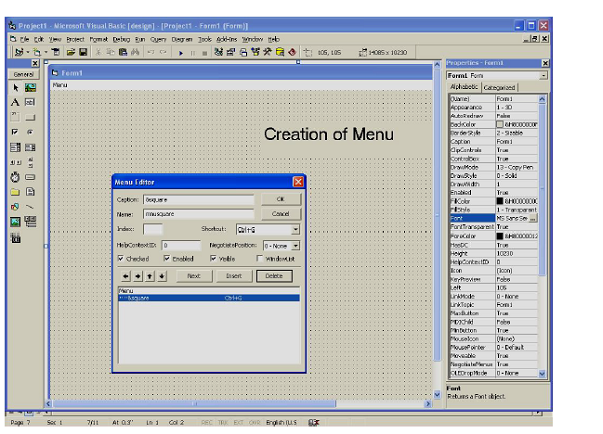
Figure: The Menu Editor

2219_menu item square.png

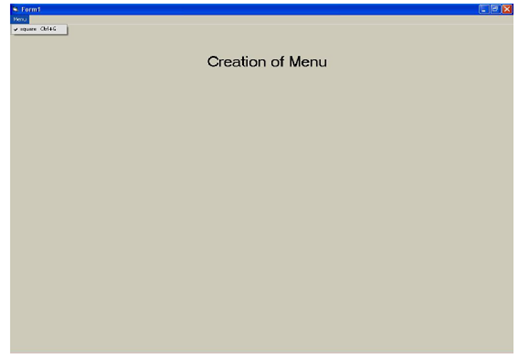
Figure: Menu Item Square


Related Discussions:- Creation of the menu in visual basic

Deleting handlers with class wizard, Deleting Handlers With Class Wizard: ...

Deleting Handlers With Class Wizard: The handler can be deleted by using the class wizard. The class wizard will delete the prototype and message map entry. The user should ma

Message handling - class wizard, Message Handling: 1. The message is s...

Message Handling: 1. The message is send to the window. And it is sent to the Window Procedure. 2. The message map holds all the message handlers. 3. The window procedur

Create a procedure - vbscript, Each piece of data is passed in your process...

Each piece of data is passed in your process using an argument. Arguments serve like placeholders for the data you wish to pass into your process. You can name your arguments along

Project to create splitter window , PROJECT TO CREATE SPLITTER WINDOW   ...

PROJECT TO CREATE SPLITTER WINDOW   1. Generate the SDI application. 2. Enlarge the class tab page. 3. Select the view class. 4. On right clicking the menu pops up.

Help, i need code for assignment problem of operational research in vb

i need code for assignment problem of operational research in vb

Mfc classes, THE MFC CLASSES The CDocument, CWinAppCFrameWnd and CView ...

THE MFC CLASSES The CDocument, CWinAppCFrameWnd and CView are derived from the CObject and they give the majority of the structure and functionality.

If then else - control statement, If Then Else: The control statement ...

If Then Else: The control statement If Then Else is used for computing a condition and taking the action based on the condition. If the condition is true then the section will

Creation of the menu in visual basic, Creation of the Menu in VB 1. Ini...

Creation of the Menu in VB 1. Initiate a new project by choosing a file and then new project. 2. Now select the Standard EXE as the Project type. 3. Build the Form1 activ

Attributes, departmental store attributes

departmental store attributes

Write Your Message!

Captcha
Free Assignment Quote

Assured A++ Grade

Get guaranteed satisfaction & time on delivery in every assignment order you paid with us! We ensure premium quality solution document along with free turntin report!

All rights reserved! Copyrights ©2019-2020 ExpertsMind IT Educational Pvt Ltd