Reference no: EM13169897
CONSIDER THE FOLLOWING SET OF DATABASE TABLES.
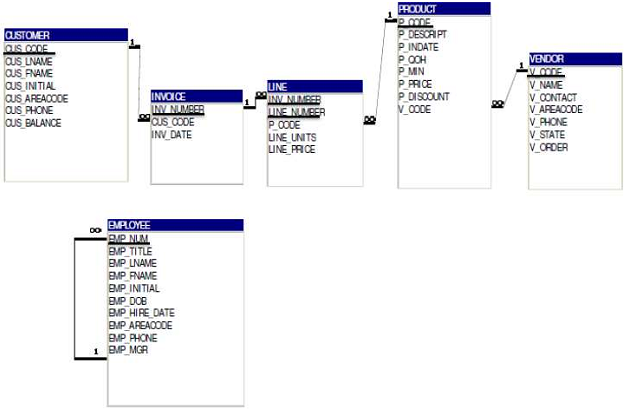
The diagram shows a database made up of 6 tables with all primary keys underlined. Please take note of foreign keys (most of them carry the same names as the corresponding primary keys they reference):

CUS_CODE in INVOICE, INV_NUMBER & P_CODE in LINE, and V_CODE in PRODUCT. The only exception to the naming convention is the EMP_MGR foreign key in EMPLOYEE which references the EMPLOYEE table in a recursive relationship.
- In addition to the above six tables, the script creates two tables V (default vendor table data) and P (default product table data). The only purpose for tables V and P is to demonstrate bulk insert - i.e. how to copy data from one table to another. E.g., to copy all records from table V to Vendor we issue the following: INSERT INTO VENDOR (SELECT * FROM V).
- Notice how I didn't include a FOREIGN KEY constraint in EMPLOYEE to reference itself (in order to implement the recursive relationship manages) because we still have not yet created the table. This has to be done separately as shown below AFTER creating the EMPLOYEE table: ALTER TABLE EMPLOYEE ADD FOREIGN KEY (EMP_MGR) REFERENCES EMPLOYEE;
I. Part 1: Understanding the SQL script, creating the database and inserting data
1. Double-click on the myCompany.SQL script file which will automatically put a copy of the script in the command input sub-window of SQL Developer. [or go into SQL Developer and do a File -> open to open it that way if necessary]
2. Go through the file and make sure you understand every single line of code in it before you proceed.
3. When done, press the Run Script (NOT the Run Statement) button in SQL Developer and you should notice the output of all commands appear sequentially in the output area.
II. Part 2: Writing SQL SELECT statements (one SQL statement per problem):
1. Display all product information for products that contain the string ‘saw' in their description.
2. Display all product information for products currently selling for less than $20.00 and which have more than 100 units in stock (recorded in attribute P_QOH or quantity on hand).
3. Display all product information for products currently selling for less than $20.00 or which have more than 100 units in stock (recorded in attribute P_QOH or quantity on hand).
4. Display the product code, description and price for products provided by vendor 21344.
5. Display the product code, description, price and price after discount (a computed column that uses the P_PRICE and P_DISCOUNT (a percent discount) --- name the computed column NewPrice) for products for which no vendor is specified in table PRODUCT.
6. Display the product code, product description and vendor name for products provided by vendors located in the state of TN.
7. Display the full names of employees who manage other employees, ordered by last name.
8. Display the count of distinct products ordered so far by customers (i.e. exist in table LINE).
9. For every manager, display the manager employee code along with the total number of employees s/he manages.
10. Display the product description, the full customer name and the customer balance for products ordered by customers having a customer balance between $100.00 and $500.00 (inclusive of both). Order by customer last name, then first name, then initial.
11. For every invoice, display the invoice number and the total dollar amount for all products purchased in the invoice, ordered by invoice number in descending order.
12. For every invoice, display the invoice number, invoice date and the total dollar amount for all products purchased in the invoice, ordered by invoice number in descending order and then by invoice date in ascending order.
III. Part 3: Creating an SQL VIEW:
13. Create an SQL view called VENDOR_PRODUCTS_TOTALS that shows the vendor name, vendor code and the total number of products provided by the vendor but only for vendors providing two or more products. When done, issue a select * from VENDOR_PRODUCTS_TOTALS statement to display the contents of view VENDOR_PRODUCTS_TOTALS and include them in your report.
IV. Part 4: Writing UPDATE and DELETE SQL statements:
PS: if you ever need to UNDO changes made to the database by an UPDATE or DELETE statement, issue command rollback in the command input sub-window of SQL Developer.
14. Start by issuing a select * from product statement. Copy the results into your report. Then, create and run an SQL update statement which changes the P_DISCOUNT to 0.03 percent for all products that currently have a discount of 0. Finally issue a select * from product statement after the update and copy the results into your report. This will show you the change produced by your update statement.
15. Start by issuing a select * from product statement. Copy the results into your report. Then, create an SQL update statement which doubles the P_DISCOUNT for all products provided by vendors in TN or FL. Finally issue a select * from product statement after the update and copy the results into your report.
16. Start by issuing a select * from LINE statement. Copy the results into your report. Then, create an SQL delete statement to delete invoice lines that include 2 or more units of product code ‘23109-HB'. Finally issue a select * from LINE statement after the delete and copy the results into your report. This should show you the change produced by your delete statement.