Reference no: EM132624559
ITECH2000 Mobile Development Fundamentals - Federation University
Assessment Task - AppInventor App (Math Game)
Overview
You will implement in AppInventor a multi-screen app, based on a given project specification. This app will use a range of components taught up to and including Week 7 of the course. You will also submit a brief report containing pseudocode and a description of how your solution utilises various concepts learned in class.
Learning Outcome 1: Understand constructs typical of many programming languages such as: variables, expressions, assignment, sequence, selection, iteration, procedures, parameters, return values.
Learning Outcome 2: Design, develop, test and debug mobile apps from a given textual program specification.
Learning Outcome 3: Analyse the input, processing and output needs of small programming problems.
Learning Outcome 4: Design code sequences to realise algorithms in a programming language.
Learning Outcome 5: Design basic user interfaces and develop storyboards to convey designed interaction sequences.
Learning Outcome 6: Develop test cases to ensure correct behaviour.
1. App Details
Your assignment is to develop an Android application, using MIT AppInventor, which consists of a simple but challenging addition game. The user is presented with 9 random numbers and a target number and must select 3 numbers or less to add up to the target within a time limit. Each time the user correctly adds up to the target number, the difficulty increases slightly with a larger target displayed and 9 new random numbers, while the time limit also resets. The game continues until the user does not reach the target (or exceeds it) using 3 numbers, or when the time limit runs out.
The application should contain a number of screens, which are described in the following sections. Note: Your app does not need to look identical to the provided screenshots. As long as you fulfil the requirements in a logical way that follows what you have learned this semester, you have free reign to design your interfaces as you like.
Screen 1: Menu
When the application is first opened, a menu should be displayed with options to view the rules of the game ("How To Play"), play a "Quick Game" (default game parameters), and to play a "Custom Game" (allow the user to modify some game parameters). Clicking on each entry in the menu should open the appropriate screen.
Screen 2: How to Play
When the user opens the "How to Play" screen, it should display the rules of the game. On Moodle, you have been provided with a text document howtoplay.txt, which contains the rules of the game. This text file should be imported into your AppInventor project, and this screen should load and display the text from the file at runtime.
This screen should also provide some way for the user to navigate back to the menu screen once they have finished reading the rules.
Screen 3: Quick Game
When the "Quick Game" option is selected from the menu, the app should open another screen that includes the game interface and mechanics. Figure 1 displays a rough outline of how the game is displayed to the user.
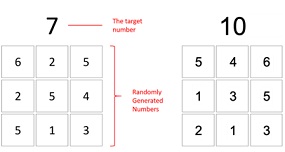
Figure 1. Examples and outline of the game screen. Note that two separate game screens are shown.
When the game starts, a set of 9 random numbers should be generated and displayed, as well as a random target number. In Round 1 of the game, the 9 random numbers should be between the range of 1 and 6. Note that it should be possible to add up to the target using 3 or less of the 9 randomly generated numbers, so you will have to think carefully and design your algorithm in such a way that this is always possible. For example, the first game screen shown in Figure 1 has a target of 7 - this could be achieved by adding up the numbers 5 and 2, or the numbers 4 and 3, or the numbers 4, 2 and 1. The second example has a target of 10, which could be achieved with the numbers 5 and 5, the numbers 6 and 4, or the numbers 6, 3 and 1. While these examples allows for multiple ways to reach the target, a game screen must have at least one way of reaching the target number using 3 or less values to be valid.
In addition, once the game has started a timer should also begin counting down from 10 seconds. It is recommended that you display the number of seconds that the user has left somehow in your interface and update this after every second passes.
To play the game, the user needs to click on the numbers to reach the target. The game should check whether the user has reached or exceeded the target after every click, and automatically load the next round if the target is reached or display the game over message if it is exceeded. You will need to keep track of how many times the user has clicked (remember: they can only use 3 numbers at most), and the running total of the numbers they have selected.
Every time the user reaches the total using three numbers or less, the timer should reset to 10 seconds and the difficulty of the game should increase. This happens by increasing the maximum value of the random numbers that can be generated (e.g. the numbers can get bigger each time the user wins a round). As a result, the target number should also get bigger. The new set of 9 random numbers should be displayed along with the new target.
During each round of the game, if the user selects three numbers and the target has not been reached (or it has been exceeded), then the player loses the game. Alternatively, if the timer reaches 0 the player also loses the game. At this point, an alert should tell the user that the game is over and display their "winning streak" (e.g. the number of targets they reached during the game). The user should have the option to play again (starting from the initial difficulty) or exit back to the menu.
Screen 4: Custom Game (Advanced Work)
This screen presents the user with options to play a "custom game" by choosing certain rules for the game, to modify those explained in the specification for Screen 3. Specifically, the user should have the ability to set the following settings:
• Whether or not they want the timer to be active - if yes, the 10 second timer will count down, otherwise there will be no timer and the user has unlimited time to reach the target number;
• Whether or not they want the difficulty of the game to increase after each round - if yes, the randomly generated numbers will get slightly larger after each round, else the randomly generated numbers will not increase after each round.
• The minimum and maximum range for the random numbers to be generated from (the default values are 1 and 6) - this would allow the user to start the game with larger random numbers, which would also mean that the target number was larger.
It is important that this screen provides validation so that a game cannot be started with invalid options, for example empty values or a minimum value that is larger than the maximum.
Once the user has selected their preferred options for a custom game, they should click a button to start the game. At this point, Screen 3 should open and start the game according to the player's custom rules. These rules should be applied for the duration of the game, i.e. after every round is won, and if the user chooses to play again after losing a game.
General Requirements for Coding
While your app should meet the functionality described above, you need to ensure that you demonstrate the concepts we have covered in ITECH2000 so far. To achieve full marks you will need to ensure that you have correctly made use of each of the following components or constructs somewhere in your app:
• a Notifier
• A CheckBox
• Labels
• TextBoxes
• Buttons
• A Clock and instants
• HorizontalArrangement, VerticalArrangement or TableArrangement (or all of them)
• The File component (reading from a file)
• The list construct
• A repetition construct
• A decision construct using a Boolean (AND or OR) expression
• Procedures that you have defined using the ‘to do' or ‘to do ... result' blocks
Please read through all of the requirements before you commence work on the app, so you get a full sense of what is required to be done. It is recommended that you first model any events using pseudocode before commencing programming.
2. Brief Report
As well as completing the program described above in AppInventor, you are also required to submit a brief report that includes the following:
• A title page that includes your name and student ID number.
• Pseudocode describing the behaviour of three (3) events that your app will respond to, including the game logic when a user selects a number. Ensure that you clearly label your pseudocode so that it is clear what aspect you are modelling.
• For each of the design components/blocks listed in the previous section (General Requirements for Coding), you should describe in 2-3 sentences how you used this component in your solution and justify why. If you have used a component multiple times, please describe one example.
Attachment:- Mobile Development Fundamentals.rar