Reference no: EM133134321
CSCE 5218 Deep Learning - University of North Texas
You will write your code and any requested responses or descriptions of your results, in a Colab Jupyter notebook.
1. Implement AlexNet

Figure 1. Architecture of AlexNet (Krizhevsky et al., NIPS, 2012).
AlexNet is a milestone in the resurgence of deep learning, and it astonished the computer vision community by winning the ILSVRC 2012 by a large margin. In this assignment, you need to implement the original AlexNet using PyTorch. The model architecture is shown in the Figure1, which is from their originalpaper. You should have a good understanding about the paper because we discussed it in class and you reviewed it.
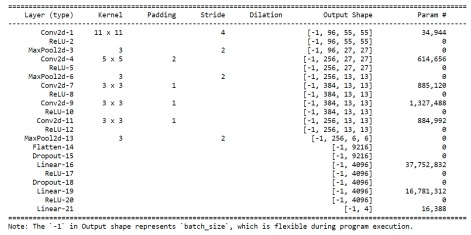
More specifically, your AlexNet should have the following architecture (e.g. for domain prediction task) in Figure2:

Figure 2. Detailed architecture of AlexNet.
Before you get started, we have several hints hopefully to make your life easier:
ˆ In the figure the image size is 224 x 224 x 3, but unfortunately that is a mistake. The real input should be RGB image of shape 227 x 227 x 3.
ˆ Thanks to the improved hardware (i.e. GPU with larger memory), you don't need to split the convolutions into two cards any more (as shown in the figure).
ˆ There are many implementations online regarding the AlexNet, for example, torchvision library has an official implementation:here. We strongly recommend you to check it out, but please be aware that this implementation is incorrect as it is a modified version of AlexNet (not the one we described above). Therefore, if you simply copy/paste this code, you won't get any points.
Instead, we expect you to read and understand this implementation, and make modifications based on it (which is much easier than you thought).
Your model should use torch.nn.Conv2d, torch.nn.Linear, torch.nn.ReLU, torch.nn.Dropout etc. modules that are built-in to PyTorch. You don't need to (and are not supposed to) implement any of these modules on your own.
ˆ Lastly but probably most importantly, for your convenience, the data loader and the train- ing/evaluation scripts are provided in thestarter code. Please download and read the code carefully. More specifically, there is a PACSDataset class for this assignment. You can download the images of the dataset fromhere.
Briefly speaking, the dataset contains 9991 images (train + val), including images from 4 domains (art painting, cartoon, photo and sketch) and 7 different classes (dog, elephant, giraffe, guitar, horse, house and person) It is a good benchmark to study the domain shift problem, as you can tell an image of the same class can have very different appearances according to domain. More details about the dataset can be foundhereif you are interested.
Therefore, each image has two different labels, one for class and one for domain.
The provided dataset can handle both labels, and you could specify the label type by flag label type. In next part you need to train models for domain prediction and class prediction.
ˆ Please be aware that the signature of the function is fixed, so please DO NOT change the function signature.
ˆ You need the following packages in your Python environment:
matplotlib seaborn torch absl-py scikit-image tensorboard torchvision tqdm.
Instructions
1. Download the starter code, which includes data, from Canvas, and put the starter code in a Colab notebook.
2. Complete the implementation of class AlexNet, and training the model for domain prediction task.
A sample usage for the provided training/evaluation script (from the shell) is python cnn trainer.py --task type=training --label type=domain --learning rate=0.001
--batch size=128 --experiment name=demo
3. You may need to tune the hyperparamters to achieve better performance.
4. Report the model architecture (i.e. call print(model) and copy/paste the output in your notebook), as well as the accuracy on the validation set.
2. Enhancing AlexNet
In this part, you need to modify the AlexNet in previous part, and train different models with the following changes.
Just a friendly reminder, if you implement AlexNet following our recommendation, it should be very easy (e.g. just changing a few lines) to perform the following modifications.
Instructions
Larger kernel size
Initial AlexNet has 5 convolutional kernels as defined in the table in Section 1.
We observe that for the 1st, 2nd and 5th convolutional layers, a MaxPool2d layer is followed to down- sample the inputs.
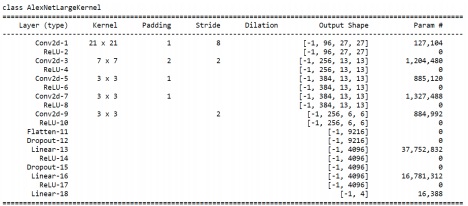
An alternative strategy is to use larger convolutional kernel (thus larger receptive field) and larger stride, which gives smaller output directly.
Please copy your AlexNet to a new class named AlexNetLargeKernel, and implement the model fol- lowing the architectures given in Figure3.

Figure 3. AlexNet with larger kernel.
Note that, please use the same optimal hyperparameter with Section 1 to train the new model, and report architecture and accuracy in your report.

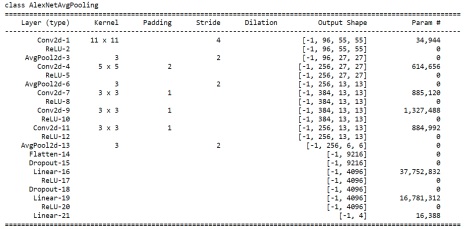
Figure 4. AlexNet with different pooling.
Pooling strategies
Another tweak to the AlexNet is the pooling layer. Instead of MaxPool2d another common pooling strategy is AvgPool2d, i.e. to average all the neurons in the receptive field.
Please copy your AlexNet to a new class named AlexNetAvgPooling, and implement the model following the architectures given Figure4.
Note that, please use the same optimal hyperparameter with Section 1 to train the new model, and report architecture and accuracy in your report.
Visualizing Learned Filter
Different from hand-crafted features, the convolutional neural network extracted features from input images automatically thus are difficult for human to interpret. A useful strategy is to visualize the kernels learned from data. In this part, you are asked to check the kernels learned in AlexNet for two different tasks, i.e. classifying domains or classes.
You need to compare the kernels in different layers for two models (trained for two different tasks), and see if the kernels have different patterns.
For your convenience, we provided a visualization function in thestarter code( visualize kernels).
Instruction
ˆ Train two AlexNet on the PACS dataset for two different tasks (predicting domain and predicting class, respectively) using the same, optimal hyperparameters from Section 1.
ˆ Complete a function named analyze model kernels, which: (1) load the well-trained checkpoint,
(2) get the model kernels from the checkpoint, (3) using the provided visualization helper function visualize kernels to inspect the learned filters.
ˆ Report the kernel visualization for two models, and 5 convolution kernels for each model, in your notebook. Compare the learned kernels and summarize your findings.
Attachment:- Deep Learning.rar