Reference no: EM13789
Build the GUI layout of the game
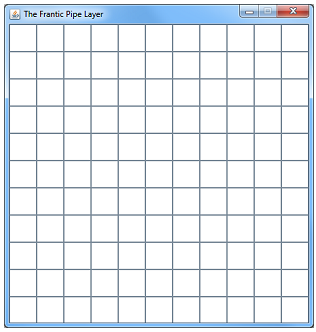
Create a class called PipeGameApp.java which will be the main game user interface. The interface should have the title "The Frantic Pipe Layer" and contain an 11x11 grid of 40pixel x 40pixel buttons as shown below. The buttons should be arranged on a BoardPanel (which is a subclass of JPanel that you can download along with this assignment in the BoardPanel.java file). The BoardPanel ensures that the size of the buttons do not change. Make sure that your window opens with all buttons enabled and not selected.

Working Buttons
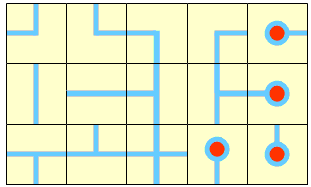
The PipeGame class represents the actual game without the graphical user interface. The idea is that the game stores a grid of pipe shapes that are placed onto it. The user will be able to click on any unoccupied grid locations to place a pipe piece down. The very first pipe piece that must be placed is the valve pipe shown here to the right. All other pipe pieces must be non-valve pipes and may be one of the following:

Also note that the valve pipe is a special one and is called pipesStart.GIF.
When the game is running, the cursor should always show the next (i.e., current) pipe piece that the user may place so that the user sees the pipe piece before placing it down. The getNextPipe() method in the PipeGame class returns the next pipe to be placed. You can then create an image icon for that pipe as follows:
ImageIcon i;
if (game.getNextPipe().isValve())
else
i = new ImageIcon("pipesStart.GIF");
i = new ImageIcon("pipes"+ game.getNextPipe().toString() +".GIF");
Then you can use the following code to change the cursor into any given pipe picture (assuming that tiles is the BoardPanel object that contains the buttons):
tiles.setCursor(Toolkit.getDefaultToolkit().createCustomCursor(i.getImage(),
new Point(0,0), "pipe"));
Then to return the cursor to normal, you can just use:
tiles.setCursor(Cursor.getDefaultCursor());
Add appropriate event handlers to the buttons so that when the user clicks on a button, a pipe gets placed at that location. To do this, you simply need to store the image of that button. In JAVA, you can do this by setting the button's "selected icon" as follows:
String currentPipeCodes = game.getNextPipe().toString();
aButton.setSelectedIcon(new ImageIcon("pipes"+ currentPipeCodes +".GIF"));
aButton.setSelected(true);
Remember that the first pipe (i.e., the valve pipe) is a special case using the "pipesStart.GIF" file. Once any pipe is placed, a new randomly chosen pipe is used as the next pipe piece to be placed. Adjust the static Random() method in the Pipe class to return a random pipe piece (i.e., a new pipe that has random openings in the 4 directions) instead of the same piece each time. Make sure that your code works.
Look over the PipeGame class since it already maintains attributes for keeping track of a 2 dimensional grid of Pipe objects, the number of pipes that have been placed on the grid so far and the next pipe to be placed. An instance method called resetPipes() resets the grid so that all Pipes in the grid are null to begin and the next pipe to be placed is the valve pipe.
Make sure that you can place lotsa pipes all over the grid before continuing.
(3) Smart Pipe Placement
Now you will adjust your code so that pipes can only be placed on a grid location if the pipe actually fits with the (up to) 4 pipes around it. Also, once a pipe has been placed at a location, no other pipe can be placed there.
Each pipe piece is open in 1,2,3 or 4 directions. The end pieces are shown with red circles.
Pipes store 4 booleans, indicating whether or not the pipe is open at the top, right, bottom or left as well as a boolean indicating whether or not it is the valve piece (set to false for all 15 pieces shown above).
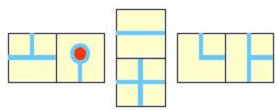
Instance methods fitsBelow(Pipe p), fitsAbove(Pipe p), fitsToLeftOf(Pipe p), and fitsToRightOf(Pipe p) return a boolean indicating whether or not the receiver pipe fits below, above, to the left of or to the right of the given pipe p, respectively. Note that two pipes "fit" together if they both have openings that meet when placed beside each other or both do NOT have openings.
Here are examples of pipes that "fit" beside one another:

Here are examples of Pipes that DO NOT "fit" beside one another:

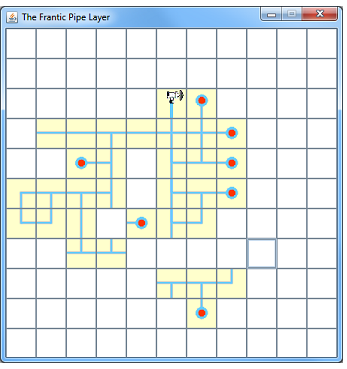
Modify the instance method called placePipe(int row, int col) that tries to place the current pipe at the specified grid location. Currently the pipe is always placed whether or not it fits properly. Adjust the code so that if the pipe does not fit there, false is returned, otherwise true is returned. Also, if the pipe fits at this location, the number of placed pipes is incremented and a new randomly chosen pipe is chosen as the next pipe to be placed (not the valve, since there is only one valve allowed). The next page shows a valid board after a while of playing. Make sure to hand in all your pipe picture files as well, as they are needed to run your code.
