The GridLayout class
The final layout we will describe here is the GridLayout class. What this layout does is to place the elements to be added according to a grid of rows and columns. When you define a GridLayout object it has two arguments: the first is the number of rows and the second is the number of columns. The code to demonstrate this is shown below; it uses three rows and two columns.
import java.awt. *;
import javax.swing. *;
public class FrameDemo extends JFrame
{
private final int numOfBut = 5;
private JButton [] buttons = new JButton [numOfBut ];
public FrameDemo (String title)
{
setSize(300, 300);
setTitle(title);
/* Create some buttons. */
for (int i = 0; i < numOfBut; i++)
{
buttons [i ] = new JButton("Button " + i);
}
/* Place some buttons. */
Container cp = getContentPane( );
// set size of grid - rows then columns cp.setLayout(new GridLayout(3, 2)); for (int i = 0; i < numOfBut; i++)
{
cp.add(buttons [i ]);
}
}
}
The display corresponding to the code is shown in Figure.
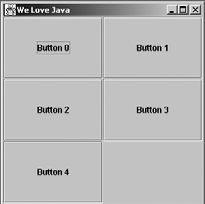
As you might expect, in the GridLayout model the elements are arranged into a grid. Note how the grid is filled. Here five buttons have been added with the remaining part of the grid being empty.
We have explained just three of the standard layout models that are supported in Java. Among the other standard models are CardLayout, GridBagLayout and BoxLayout. The models are simple and easy to work with. In cases where the standard models do not meet your requirements, you can write some bespoke classes using the LayoutManager interface; however, the details of this are outside the scope of this course.
As an aside, it is worth mentioning that it is also possible not to use any layout manager and to place components manually. This is known as absolute positioning. It is done by specifying the layout manager to be null, adding the component to the holder in the normal way and then using the setBounds method to place and size the component in the holder. For example:
...
holder.setLayout(null);
JButton b1 = new JButton("Java!");
holder.add(b1);
b1.setBounds(10, 10, 20, 20);
...
The advantage of this is that you get greater control over placement. The disadvantage is that every element has to be placed manually, rather than relying on a layout manager. This can have major ramifications when you have to change the user interface; for example, inserting a new element will mean that many of the existing elements will need to be moved.
Java Assignment Help - Java Homework Help
Struggling with java programming language? Are you not finding solution for your The GridLayout class homework and assignments? Live The GridLayout class experts are working for students by solving their doubts & questions during their course studies and training program. We at Expertsmind.com offer The GridLayout class homework help, java assignment help and The GridLayout class projects help anytime from anywhere for 24x7 hours. Computer science programming assignments help making life easy for students.
Why Expertsmind for assignment help
- Higher degree holder and experienced experts network
- Punctuality and responsibility of work
- Quality solution with 100% plagiarism free answers
- Time on Delivery
- Privacy of information and details
- Excellence in solving java programming language queries in excels and word format.
- Best tutoring assistance 24x7 hours